Blog Post #17

Presets in editing, good or bad ?

In Blog Post #16 last week I discussed editing and touched on presets. In this blog post I would like to discuss my thoughts on presets, and whether they have a place in the creative process of photo editing.

If you are on social media and subscribe to one of the numerous photography groups on-line, you will probably notice that at times you can be bombarded by adverts for “Professional Presets” or “Must Have Presets” etc. Some of these even come from respected photographers, and for a price, they claim that you too can make your photographs look professional, just like theirs. So what is a photo editing preset?

In its simplest form, a photo editing preset is a way of creating an effect on a photo or multiple photos at the same time with one click of the mouse.

If you ave never used them, what they do is to automatically position the various sliders in the editing software to a value that will give a particular effect on your image. You can usually then go in and tweak them slightly to suit your requirements but in effect the most of the work has been done for you and will produce the chosen preset effect.

Presets can either be created by the photographer themselves or by acquiring them ready set through free give-aways or by purchasing them. Many photographers look on presets as cheating or lazy technique but they can have their uses. For example, if you have taken a number of photos at an event and the lighting is pretty flat you may find that your final images lack contrast and punch. You could edit one image to the way you want it to look, save the settings as a preset and then apply that pre-set to all the images taken on that day. It is similar to darkroom work whereby to boost contrast you would use say a grade 4 or 5 paper.

I don’t use them extensively but do see them as being another feature in the editing toolbox. I haven’t tried out the presets in Lightroom to any great extent but I do like the black and white presets that are included in Silver Efx Pro 2 which I have as a Lightroom plug-in. I create a copy of the Raw image in my library and when I am finished editing in Silver Efx Pro 2 I transfer it over to Lightroom for some final tweaking, saving the final image as a JPEG. For colour I rarely use presets but one instance where I did use them was in my “Brexit….one day at Westminster” collection of photographs which you can view in my portfolio street photography gallery if you follow the link.

As you may have gathered I do edit my Raw images and in most cases convert to black and white. For my Brexit images however I wanted to keep them in colour as the colours of Brexit were so important given the flags, banners etc. on display. I didn’t however want them just to be a collection of standard colour images, I wanted to try and make them stand out. I had been playing around with something called the “Dragan” effect and had seen it done very well, and very badly. It gets overdone at times but I wanted to have a more subtle version to apply to my work.

I watched some YouTube videos on how to achieve the “Dragan” effect and came up with my own recipe. Basically it involves lots of contrast, clarity, sharpness and shadow detail, and less highlights. As you can see from the adjacent image from my Brexit set that it gives the image a completely different look without, in my opinion, going over the top.

Given that I may want to use this effect again at some time in the future I decided to save it to my preset library with the name “Pete’s Dragan”.

That’s how easy it is to make your own presets. As I previously mentioned, there are many photographers out on the internet peddling photography presets for particular applications such as landscapes, Urban, portraits etc. These obviously come at a price and once you buy them you can download them into your preferred editing software package. You only get value out of your purchase if you use them obviously, but I doubt I would and hence why I have never purchased any. I have only ever used the ones that come with Lightroom or free plug-ins. Will I ever buy any? I don’t know but I am in no rush to part with my cash at the moment. If you are a fan of presets and have purchased some then I hope you are using them to good effect.

I still prefer looking at the Raw file as shot and then applying my own minimal edits when looking to covert to B&W. If I use presets its mainly as a shortcut to lift contrast or structure in the image. There are some extreme presets out there like sepia effects, film noir and such like but I generally don’t go down that road, but I may do if I am just experimenting for fun.

One final point. Many cameras these days come with filters built in to the electronics, as opposed to screwing a filter on to your lens. By using the camera menu system you can apply yellow, orange, red or neutral density filters for example and the characteristics of these filters will be applied to your image file. There are also facilities on many cameras to shoot with an analogue film effect applied such as Chrome, Velvia and on the B&W side varying makes and ISO ranges of films. These will impart the characteristics of those films on to your images including a familiar colour cast and grain. In applying these in the taking stage you are effectively employing a camera preset on to your images. These can also be added in the editing stage which is where I tend to prefer to add them if I so require. If applied in-camera at the taking stage some people call them filters. but I still see them as presets.

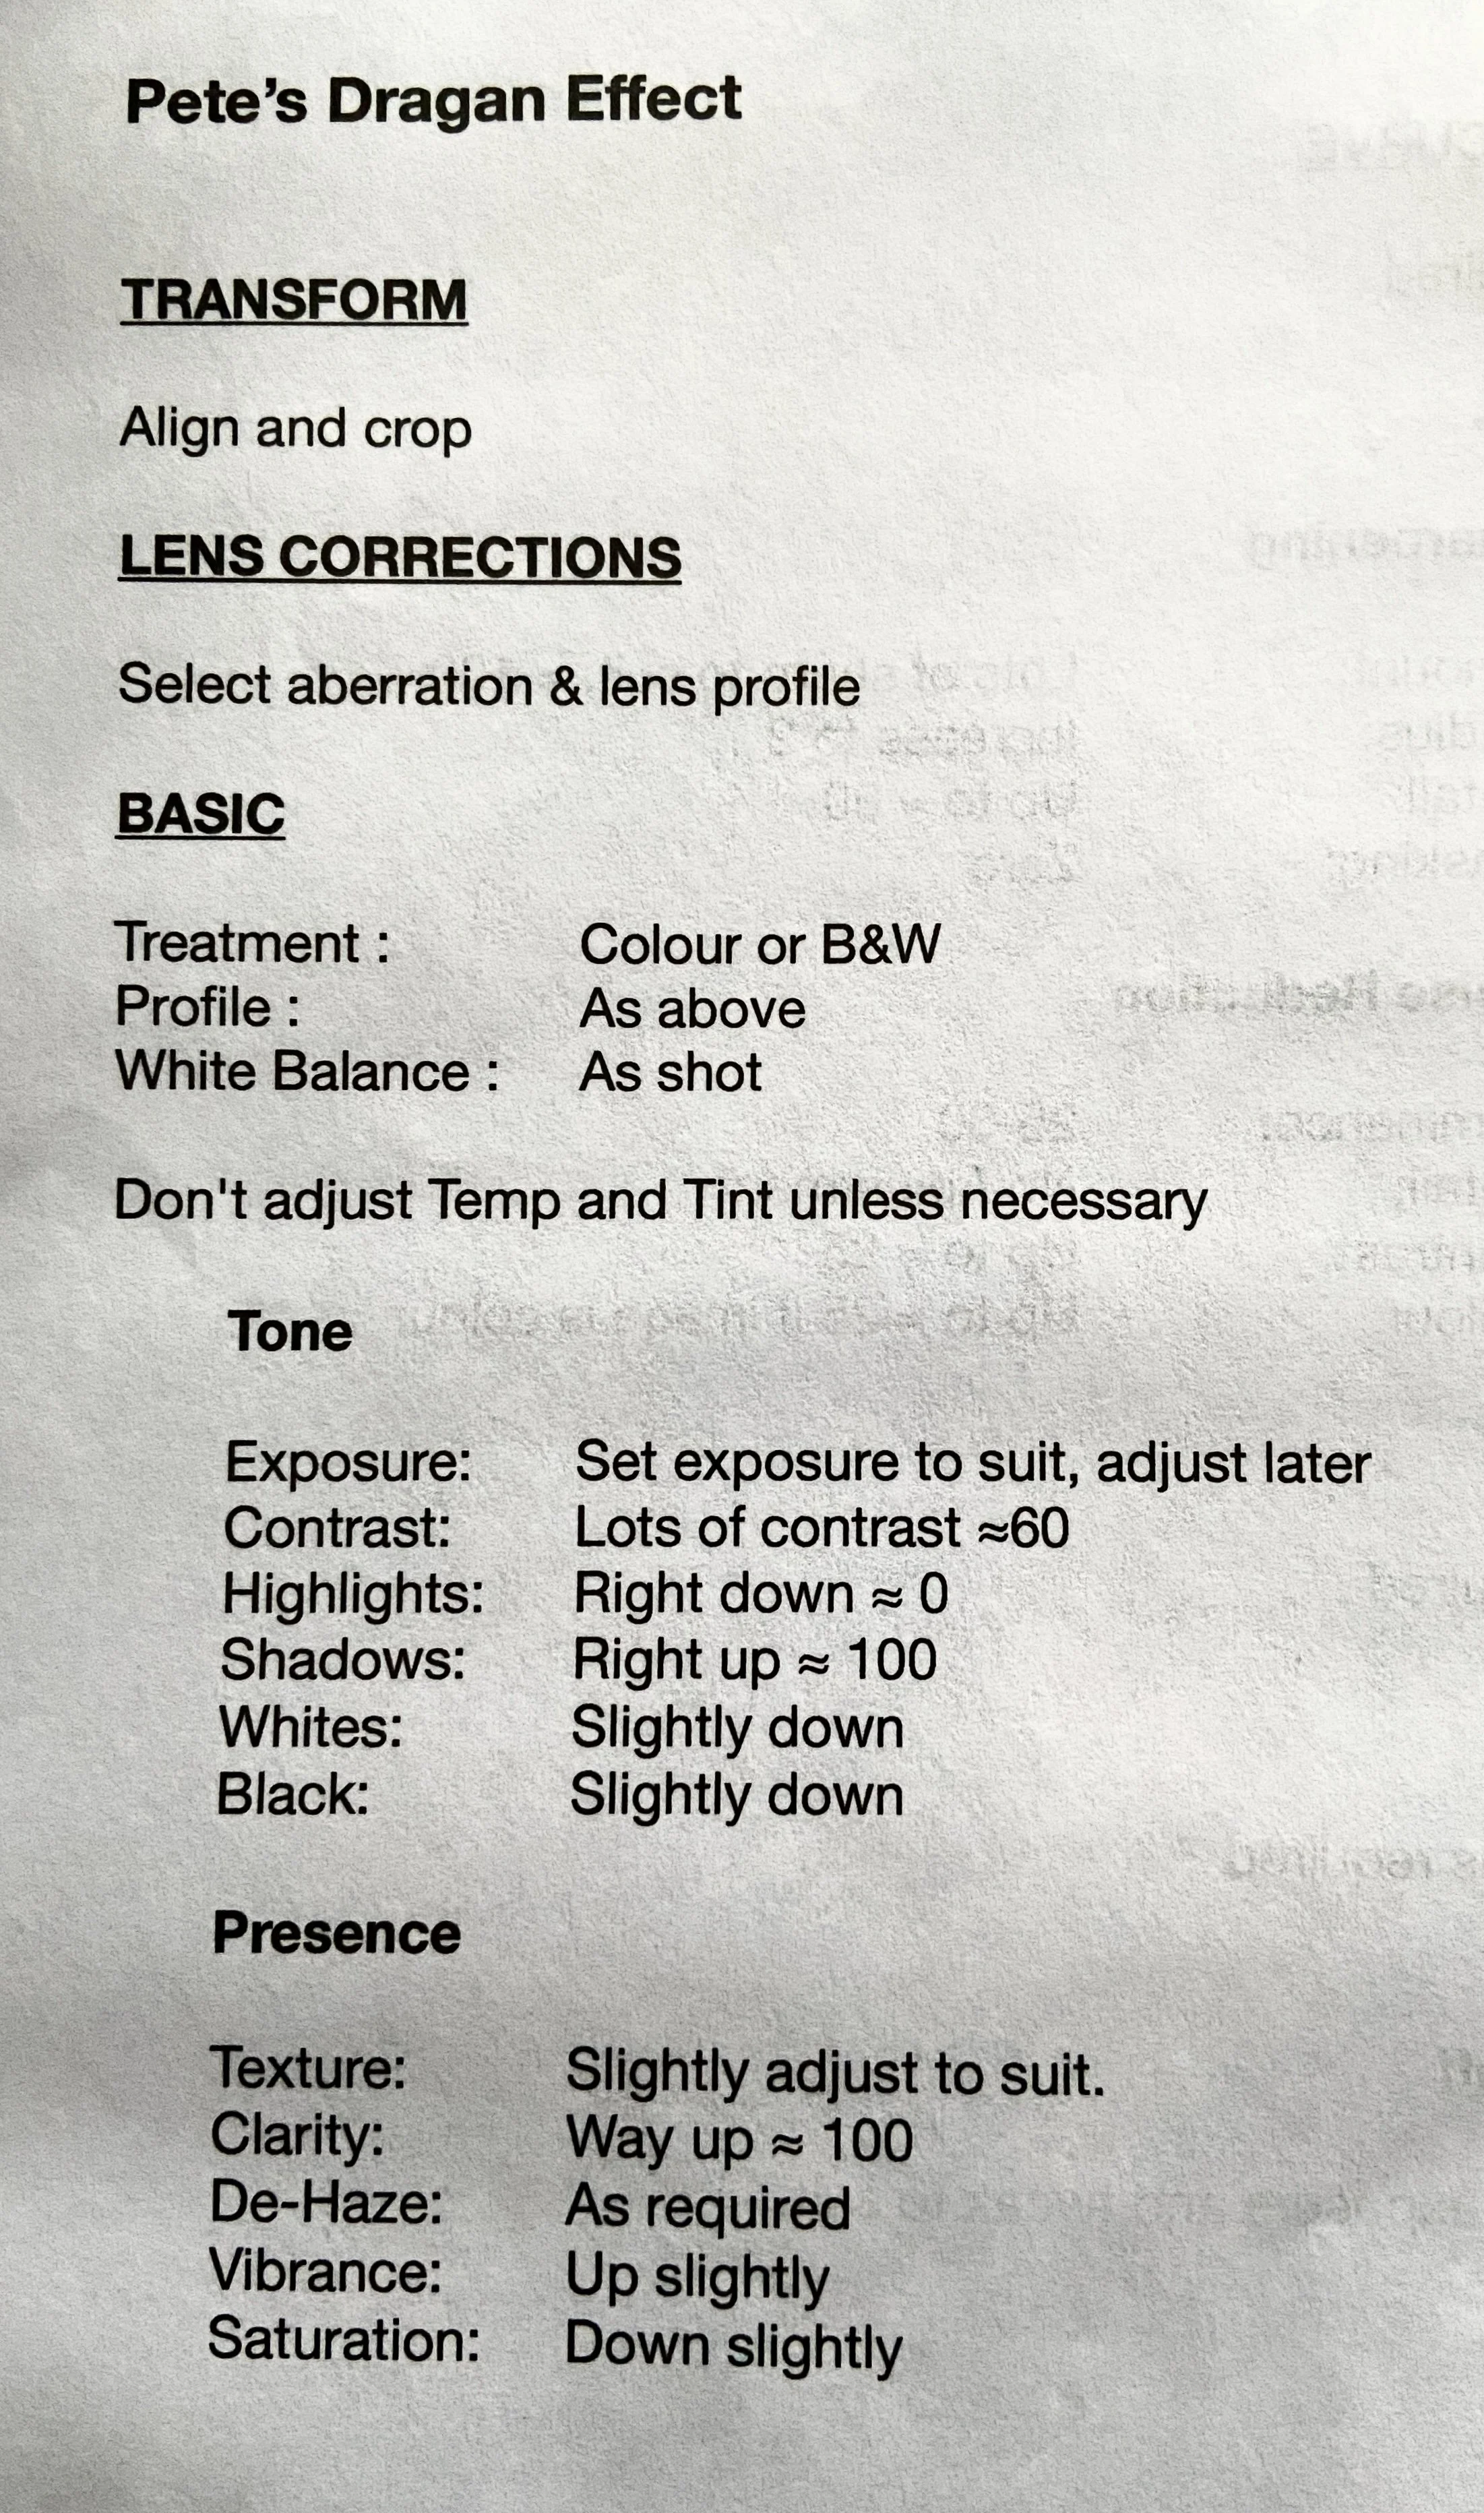
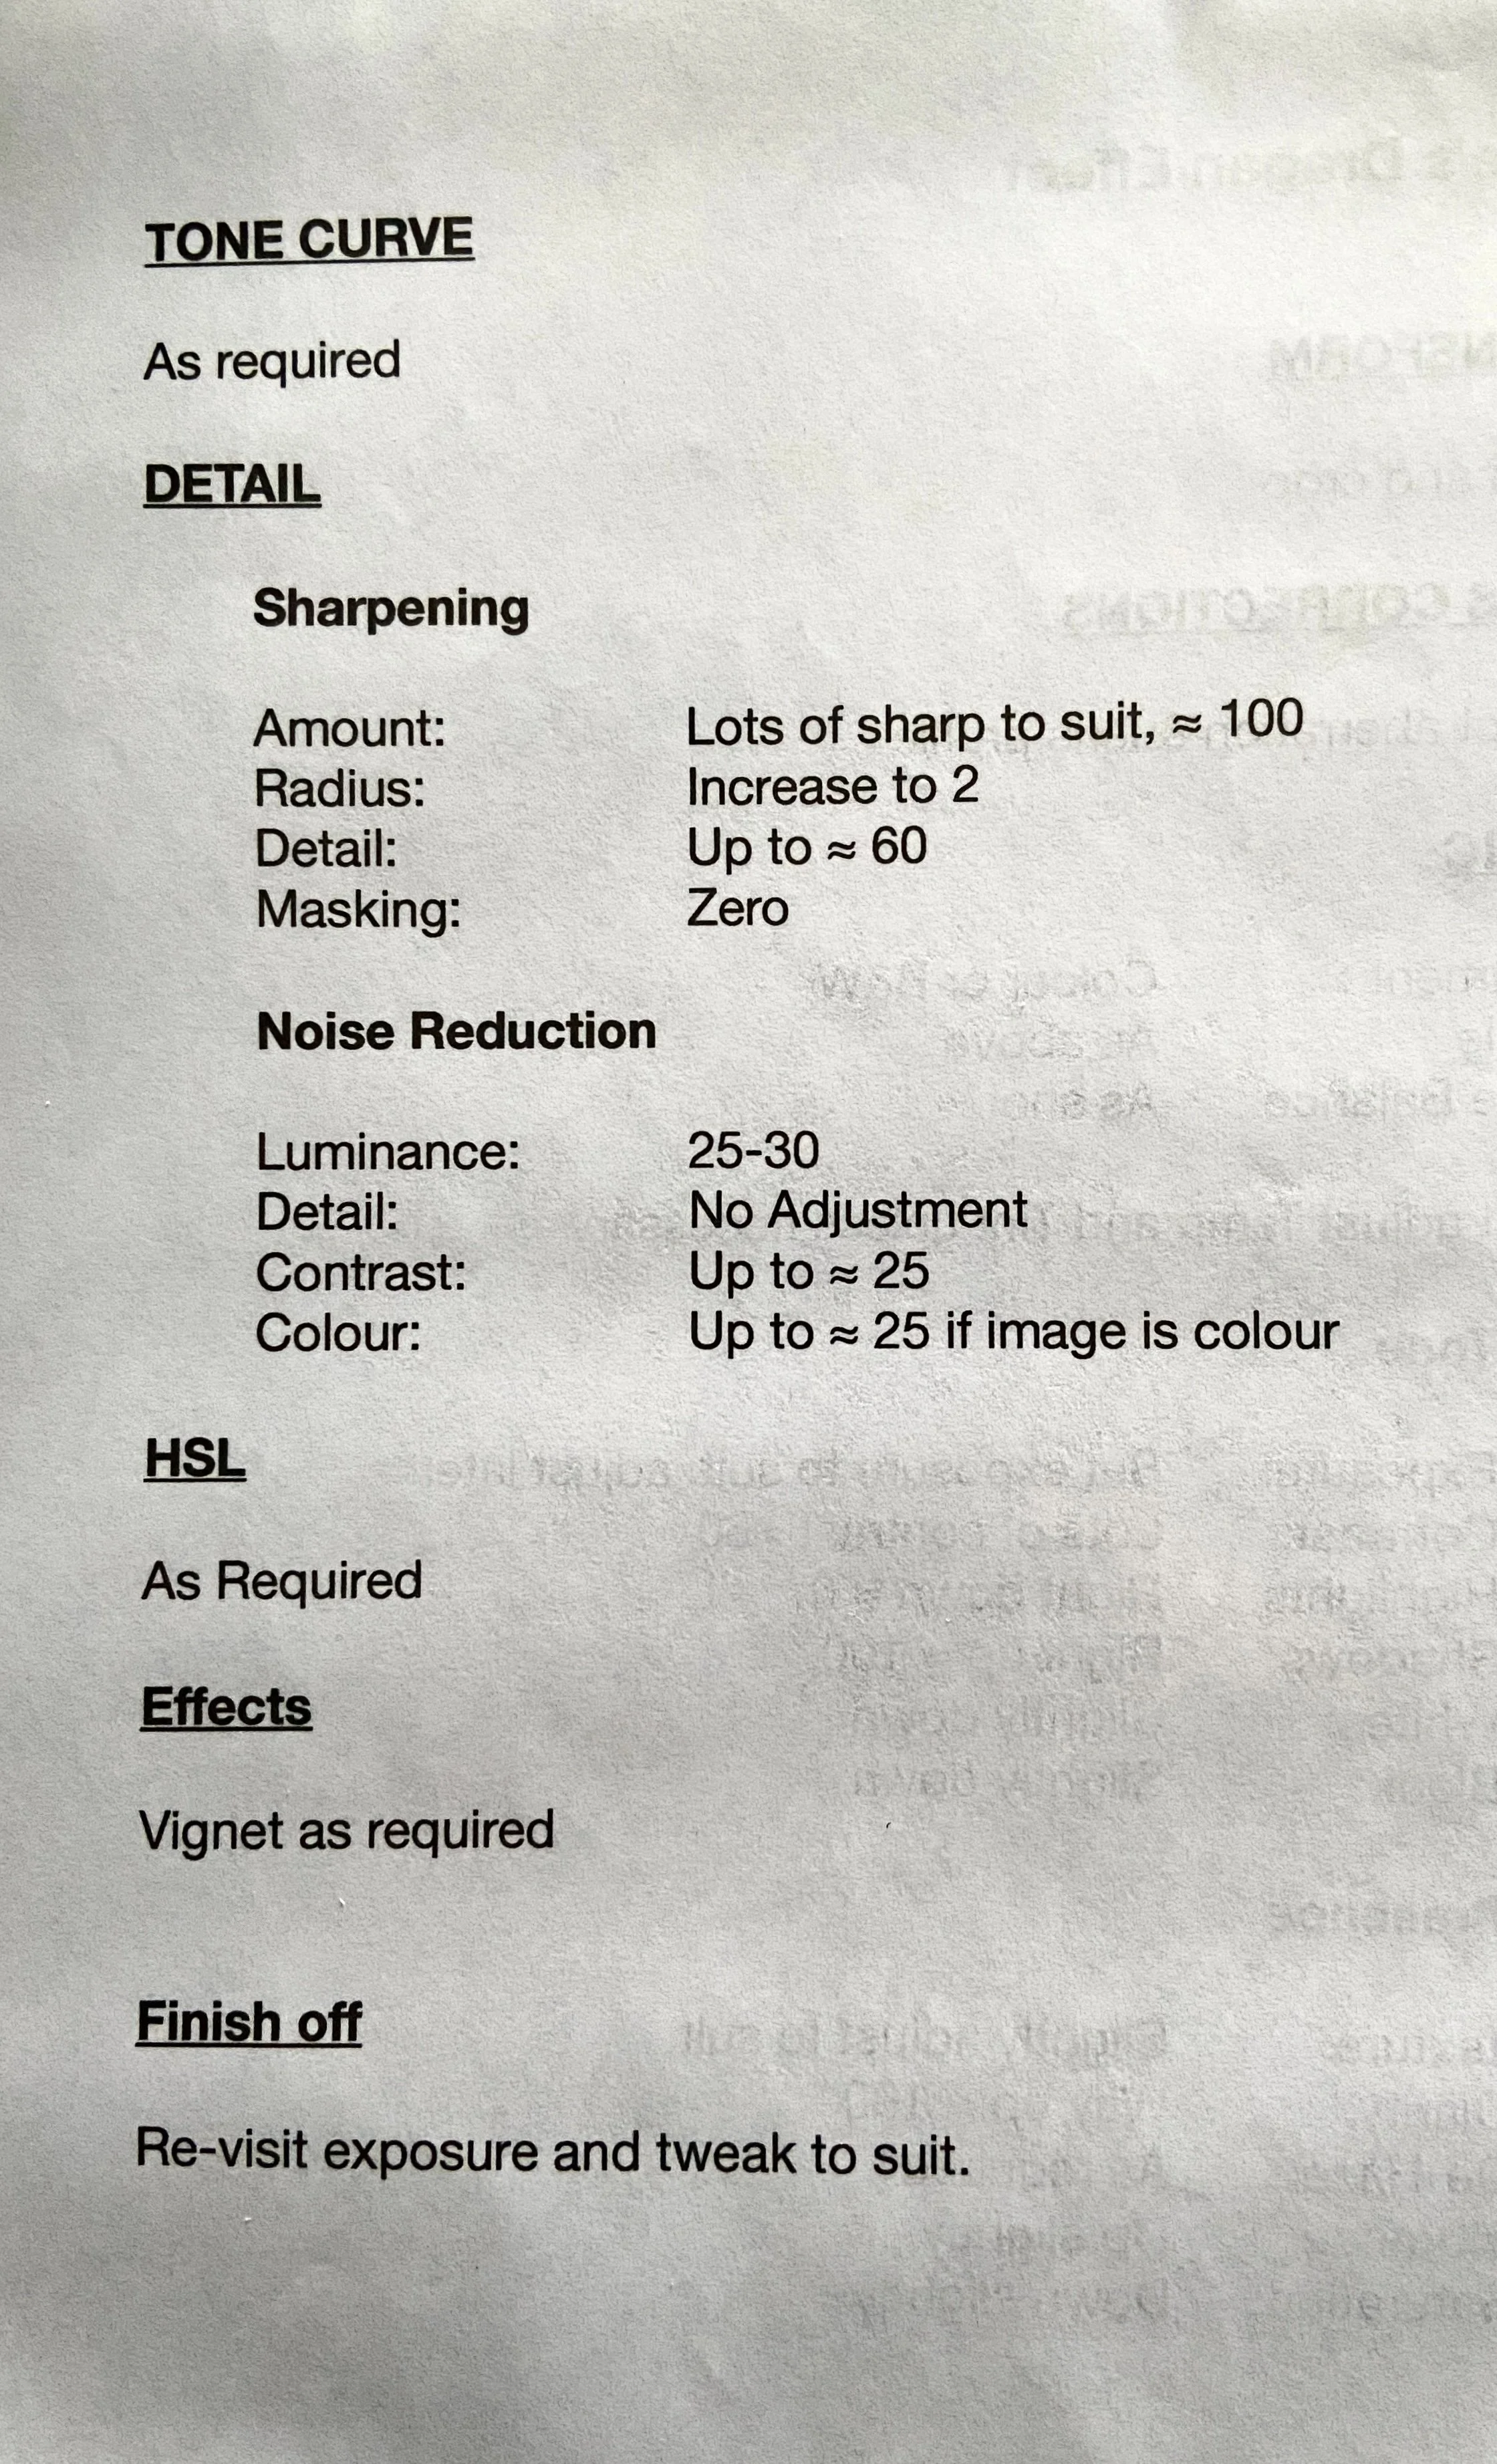
If you want to have a play around with “Pete’s Dragan” then this is a rough guide to the preset I have saved. Be careful though and don’t overdo it

Thank you for reading this blog post. I’m sorry but I don’t include a comments or “Like/Dislike” button. If you want to contact me you can do so by using the “Contact Me” facility in the website header.

Peter Degnan

Previous
Previous

Blog Post #18

Next
Next

Blog Post #16